
When I first started getting into woodworking, the inefficiency of multi-purpose drill bits led me to wonder whether a dedicated woodworking bit existed. In my research, I came across brad point drill bits and I’ve never looked back since. If you’re new to woodworking, you will definitely want a set of these in your arsenal.
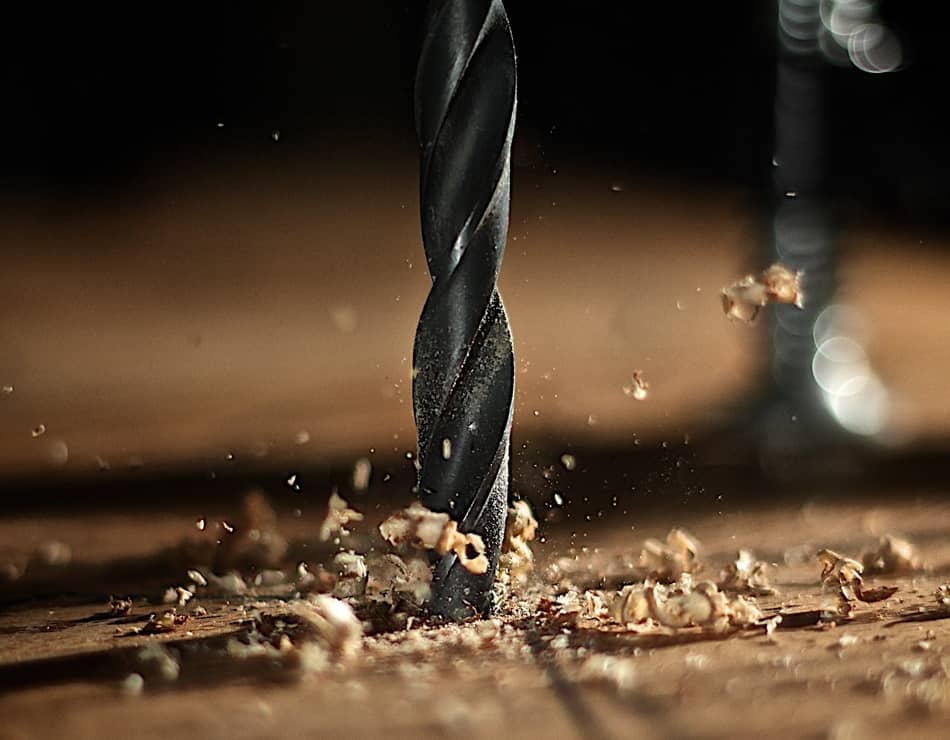
Brad point bits are used primarily for wood. They use a sharp tip which is able to bite into wood when starting to drill. The tip also provides clear and accurate positioning so you can drill exactly where intended. The spur design makes for a smooth hole with reduced splintering and tear-out.
Do brad point drill bits make multi-purpose twist bits redundant for woodworking? Are there any disadvantages to using them? Let’s take a closer look.
What are brad points used for?
Brad point bits are a cross between a regular twist bit and a spade bit. The shaft resembles a twist bit, and the protruding brad point resembles the tip of a spade bit. Brad point drill bits are available in two types: for use with softwoods and hardwoods.
When drilling wood, the lack of efficiency you get from a regular twist bit can be exasperating. Due to the shape of the cutting edge, twist bits wander as they’re unable to bite into the wood. Unless you make use of a centre punch, this often results in the hole you’re trying to drill not being where you intended.
This is where the brad point drill bit comes in. So named because of the tip’s resemblance to brad nails, it’s been designed with a sharp tip (or pin) which bites into the wood. Because of this, there is no need for a centre punch to start your hole.
The protruding tip enables you to see exactly where to place the bit to start your hole. Marking an X in the wood, you can insert the sharp tip in the centre with no fear of the bit wandering.
Another issue when working with twist bits is splintering and tear-out. Splintering can occur when you commence drilling, and tear-out can occur if you drill a hole all the way through the wood. Tear-out can ruin the integrity and aesthetics of the underside of the wood.
Due to the spur design, brad point bits cause less splintering and greatly reduce the chances of tear-out. We’ll take a look at how to almost eliminate tear-out later on.
Although mainly used for woodworking, brad point bits may sometimes be used with soft plastics and thin sheet metals.
When they are used
Brad point bits are more efficient when used in a drill press. This is because you are able to clamp your workpiece which guarantees drilling at the correct angle.
Despite being more suited to drill presses, they can be used with a handheld drill. Using a jig with bushings is recommended for use with handheld drills to keep the drill bit straight for perfectly angled drilling.
Brad points are also a superior choice to twist bits as they are able to drill anywhere in the wood. Certain parts of wood are tougher than other parts which is a problem for twist bits but not so for brad points.
What are the disadvantages?
Due to the extra steps that go into the manufacturing process, brad point bits are more expensive. You may be tempted to buy the cheapest you can find, but avoid doing so unless you really have to.
An issue with cheaper brad point bits is something woodworkers refer to as wobble. Within a brad point bit set, you may find some bits function properly and some wobble.
It is, therefore, a good idea to speak to the hardware store before you make your purchase to ensure that you can return for refund if the bits have been poorly manufactured.
Another disadvantage to brad point bits is that they are very difficult to sharpen properly when compared to regular twist bits. If the bit is unevenly sharpened, it will move around erratically, resulting in a hole that is greater than the bit’s circumference.
Sharpening should ideally be made using a specially customised grinding wheel, but can also be made using tools such as flat Swiss files, taper saw files, and rotary cutting tools. Only carry out sharpening if you’re confident in your abilities. Otherwise, look to have them professionally sharpened.
Due to the shape of the cutting edge (“head”) of a brad point bit, they are no good for enlarging a hole. The cutting edge will not sit in the hole and will move around when you start to drill.
For enlarging an existing hole, a multi-purpose twist bit is more efficient. The angled cutting edge of a twist bit sits perfectly inside an existing hole and therefore doesn’t move around when you drill.
Brad point materials
Brad point bits are made from various types of materials. Ranging from softest to hardest: steel, chrome vanadium, high-speed steel, tungsten carbide, and polycrystalline diamond.
Regular steel bits should only be used for softwoods. It’s the weakest material on offer and should be avoided if possible.
High-speed steel bits and tungsten carbide-tipped bits are the best choices for hardwoods. They’re able to tolerate a lot more heat and pressure. They also have the added advantage of being able to be used with metals. These are the recommended bits for DIYers.
Polycrystalline diamond bits would likely be resistant to any amount of heat the home DIYer could throw at it. It’s so tough that it’s able to drill through Kevlar. For most people, such a tough material isn’t necessary.
Brad point sizes
Brad point bits generally come in smaller diameters because of their use mainly for joinery.
Standard sizes are from 2mm to 25mm; however, you can find bits as long as 600mm for boring through wall studs and the like.
Tear-out
Tear-out can occur on the underside of a piece of wood when you drill a hole all the way through. This is because the last few fibres in the wood don’t have any support, and the pressure causes them to bend and tear. Although the possibility is lessened using brad point bits, precaution should still be made to avoid it completely.
Fortunately, it’s very easy to avoid. Simply place a piece of scrap wood beneath your workpiece. This supports the fibres and prevents the tearing.
Ideally, you’ll want to use a different type of wood from your workpiece if possible. This is so that you notice when you’ve drilled all the way through, be it by the difference in the colour of the shavings, or by feeling the difference upon entering the scrap wood.
How to use a brad point drill bit
Step 1: Select bit size. Measure the size of hole you want to make. Find a bit whose body length is longer by two flutes. This allows the shavings to escape, thus avoiding clogging.
Step 2: Select drill speed. For drilling hardwoods, you need a speed of around 1000 RPM for a 3mm bit, and as slow as 250 RPM for 25mm bits.
For softwoods, increase the RPM. Start at 1700 RPM for 3mm bits, and 1000 RPM for 25mm bits.
Step 3: Align bit. Mark where you want to drill and align the brad point tip on the surface of the wood.
Step 4: Start drilling. Apply gentle pressure and commence drilling. Maintain your focus and never rush.
Brad points vs Forstner bits
Forstner bits bore a larger amount of material due to their larger diameter. However, it is recommended to use a Forstner bit for making shallow holes.
Brad points vs spade bits
Similar to brad points with their sharp tips. However, the difference is in the size. Spade bits are much wider and so can bore larger holes.
Brad points vs auger bits
Auger bits excel at drilling particularly deep and wide holes. The auger bit’s design makes for efficient evacuation of the wood shavings. Single-twist bits bore deep holes and don’t need to be constantly withdrawn.
The downside to auger bits is the lack of speed with which they drill. They must also only be used with wood to avoid damaging the bit (the exception being concrete augers).